Phase 3: Deliver
When the commander approves the HAT he makes his decision on every target in it, in advance. A report arrives. The fire support coordination cell (FSCC) checks it against the target selection standards, finds the target on the high-payoff target list, and orders the attack the attack guidance matrix directs. The FSCC does not go back to the commander for permission. He gave it when he approved the HAT.
Current Operations
- T-4
- T-3
- T-2
- T-1
- T=0
- T+1
- T+2
| HPTL | 1Find | 2Fix | 3Track | 4Target | 5Engage | 6Assess |
|---|---|---|---|---|---|---|
-
T-3:45
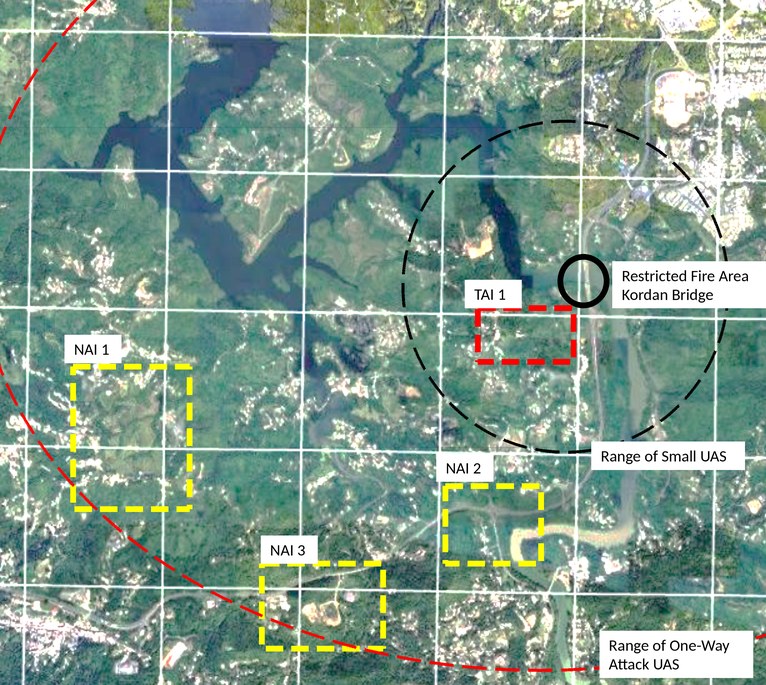
The long-range ISR UAS acquires a bulldozer and other construction equipment headed north toward the intersection in NAI 2. No personnel are visible. The vehicles look suspicious, but it is uncertain who they are or what they intend.
Move the engineer team box to the column it now belongs in, then check.
Why it is Find: The Find phase detects a potential target based on intelligence, surveillance, and reconnaissance (ISR) collection aligned with named areas of interest (NAIs). At T-3:45, ISR acquires equipment, but because identity and intent are explicitly uncertain, the asset remains an unconfirmed potential target.
Why it is NOT Fix: Fix requires continuous tracking and positive identification (PID) to confirm the entity matches HPTL criteria. Without visible personnel or clear identity, you cannot satisfy PID or establish a fixed target file.
-
T-3:40
The vehicles stop at the intersection. A group of personnel exit the vehicles and appear to be having a meeting. We can now clearly see uniforms and they appear to be armed with rifles.
Move the engineer team box to the column it now belongs in, then check.
Why it is Target: PID is confirmed (uniforms and weapons). This target is already on our HPTL and included in the TSM plan. We already know our commander wants us to shoot this target.
Why it is NOT Track: Track is the maintenance phase, holding sensor coverage while awaiting a decision or maintaining custody during movement. Because this target is on the HPTL with pre-planned fire support, PID immediately triggers active weapon-target pairing rather than passive holding.
Why it is NOT Engage: Engage only starts when the authorization or fire order is transmitted to the firing unit. The target remains in Target while final coordination of how and when we are going to engage the target occurs.
-
Select the asset to engage this target.
The engineer target package in 1D names the 105 mm battery as the primary asset. NAI 2 is a crossroads outside the restricted fire area, so the guns may fire there.
The attack guidance matrix ranks the drone first for this target, and it is the right answer once the engineers reach the bridge itself. Here they are still at the crossroads, where the guns can reach them.
The 155 mm battery is third for this target and is not on line until T-2.
-
T-3:30
The fire order has been sent to the firing unit.
Update the target tracker: move the engineer team box, then check.
-
T-3:25
The M101 105 mm howitzer battery engages the target. The long-range ISR UAS observes and records all of the engineering vehicles catching fire and becoming immobile.
Update the target tracker: move the engineer team box, then check.
Engagement complete. We will conduct a battle damage assessment and recommend a re-attack if needed. We assess these engineering vehicles are destroyed.
For this class we will leave the target here on the board. In practice you may move it to an archive position.
-
T-3:10
The Scout team identifies four heat signatures across the river inside TAI 1. The battery of the small UAS was about to die, so the sUAS was forced to return before investigating further. The Scout team reports it will be 20 minutes before another drone can be launched.
Update the tracker: move the ATGM box, then check.
We do not have PID or continuous monitoring.
-
T-2:50
The Scout team's sUAS has returned and now identifies the four individuals sheltering in a fighting position with what appears to be a rocket launcher. The sUAS returns for more battery shortly after the report is sent.
Update the tracker: move the ATGM box, then check.
We have PID and an exact location, but not continuous observation, which is required for Track.
-
T-2:30
The Scout team's sUAS has returned and has observation of the ATGM section.
Select the appropriate action. Hint: check the HAT.
The ATGM section is a planned target per the HAT, based on the commander's guidance. The commander does not want to engage it until T-1:00, to maximize surprise.
-
Update the target tracker: move the ATGM box, then check.
Why it is Track: The target is under continuous observation and cannot be struck until the designated time window (T-1:00). The active function is maintaining sensor custody and target track while holding for the operational trigger.
Why it is NOT Target: Having potential attack options during a required wait period keeps the target in Track until you initiate active strike coordination near T-1:00.
-
T-1:15
We send a fire mission to the one-way attack UAS unit with a time on target of T-1:00. The drones must not strike before that time. The unit acknowledges and launches two drones.
Update the tracker: move the ATGM box, then check.
The fire mission has been sent and the one-way attack drones have launched.
The drones are the shooter. The Scout team's sUAS stays on the target as our observer, so we will see the strike and can assess it.
-
T-1:07
The Scout team observes two groups of uniformed personnel approaching the bridge. They are carrying bags and wire. It appears as if they may be attempting to destroy the bridge.
A second engineer team has been added to the board. Update the tracker: move the Engineer team 2 box, then check.
We have continuous observation and PID, which makes this at least Track. We also have clear guidance to engage threats to the bridge or an engineer team. That authority moves it to Target.
Why it is not Engage: a fire mission has not been sent yet.
-
T-1:06
Two targets are now live at the same time.
Which target is the most urgent, and the highest priority?
The engineer obstacle team is priority 1 on the HPTL and its guidance is Immediate. The ATGM section is priority 2 and Planned. It is also the more urgent of the two: this team is at the bridge with charges and wire, and the bridge is the objective of the operation.
Here priority and urgency point the same way. They will not always, and when they disagree the commander’s guidance decides.
-
T-1:05
The enemy engineer team is on the bridge.
Which fires asset will you choose to engage the engineer threat?
The attack guidance matrix ranks the one-way attack UAS first against the engineer team. It is also the only asset that may fire: the team is on the bridge, inside the restricted fire area, where cratering munitions are forbidden.
Neither gun battery can shoot this mission at any priority. The control measure decides it before the matrix does.
-
T-1:04
The one-way attack UAS unit reports a malfunction and cannot launch any more drones. The two drones already in the air are on their way to the ATGM section.
Do you abort that mission and re-task the drones to the engineers on the bridge?
The two drones in the air are now the only asset that can strike inside the restricted fire area, and they are flying against the lower priority. Re-task them.
The ATGM section is a planned target under Suppress guidance. It stays under continuous observation and can be struck later. The bridge cannot be rebuilt.
-
You re-task the one-way attack drones to the engineers on the bridge. Update the tracker: move the Engineer team 2 box, then check.
The drones are now flying against the engineer team, so that target moves to Engage. As at T-1:15, Engage begins with the re-task order, not with the impact.
-
One target is still in the wrong column. Update the tracker: move the ATGM box, then check.
Nothing is flying at the ATGM section any more. We have continuous observation and authority to engage the target. We just need to decide how, and that is Target.
Why it is not Assess: the section was never struck, so there is nothing to assess.
Boxes move backwards as well as forwards. A target leaves a step as soon as the conditions for that step stop being true, not only when the next step begins.
-
T-1:00
The Scout team observes the drone strike on the bridge. It reports that all of Engineer team 2 appear to be dead and that the bridge is safe.
Update the tracker: move the Engineer team 2 box, then check.
The drones have struck and the Scout team is watching the target, so we can judge the result. That is Assess.
In practice this assessment would be made very quickly and the target moved to an archive. Our tracker ends at Assess, so we will leave it there for this course.
The Scout team reports two things: the engineers are dead, and the bridge is safe. The second one is the reason we fired.
-
T-0:59
The ATGM section still has to be engaged. The Scout team's sUAS has 15 minutes of battery left.
The one-way attack UAS is no longer an option. Which asset will you send the fire mission to?
We have a HAT and a synchronization matrix for exactly this reason. On the HAT the M101 105 mm howitzer battery is the alternate against the ATGM section, behind the drone. On the matrix it comes onto that target at T-1:00, so it is on line and tasked for this.
The 155 mm battery is third against this target, and the matrix has it committed to the mortars and the command post from T-2. It is not available.
The ATGM section sits outside the restricted fire area, so a gun battery is allowed to fire on it.
-
T-0:55
The fire mission has been sent to the M101 105 mm howitzer battery.
Update the tracker: move the ATGM box, then check.
The fire mission is sent, so the target is in the Engage step.
-
T-0:48
The sUAS records rounds impacting the ATGM section's position. The video makes it look likely the mission was successful, but the battery died before we could be sure.
Update the tracker: move the ATGM box, then check.
This is a standard example of Assess. The engagement is complete, but we still have to confirm we achieved what the attack guidance matrix required, which is to suppress the ATGM section for as long as our vehicles are on the bridge.
Notice that we move the target to Assess even though we are not sure. Assess is where a target waits while we work out what the strike achieved.
-
Notice that at this time we have three targets in the Assess column. For two of them, the engineer teams, the assessment has been made and the cycle is complete. For the ATGM section, we are still conducting the assessment. For this reason, we will remove the engineer teams from the tracker.
The engineer teams are off the board. The ATGM section stays until we know whether we suppressed it.
-
T-0:46
The M101 105 mm howitzer battery is asking for a battle damage assessment and the mission status. It will be fifteen minutes before the next sUAS can observe the target.
What do you tell the battery?
More than one of these answers is defensible. Only the first is wrong, because it reports a result nobody has observed.
We have not finished the assessment. The sUAS battery died before we could be sure of anything.
That is an option. The attack guidance matrix asks us to suppress the ATGM section, and firing keeps it pinned while we wait fifteen minutes to assess.
The cost is that the battery keeps firing from one position. The longer it stays there, the easier it is for the enemy to find it and fire back.
That is an option. If the section is alive it will relocate and we risk losing it, but we have over thirty minutes to find it again before the crossing.
-
T-0:45
The FSCC chooses to wait fifteen minutes for the next sUAS to observe the ATGM section again. We will not fire to suppress in the meantime.
If the ATGM section is still a threat and the M101 105 mm howitzer battery is not ready, we may use the M109 155 mm battery.
We have had no eyes on the target since the sUAS battery died, so anything we fired now would be fired blind.
-
T-0:30
The sUAS re-acquires the ATGM section's position. One man appears to be killed in action. The other three are missing, and the anti-tank weapon is gone.
Update the tracker: move the ATGM box, then check.
We know the section is still out there, but we no longer know where it is or where its weapon is. That is Find.
This is the longest backwards move in the run, from Assess all the way to Find. The assessment has answered our question: the strike did not destroy the section.
-
T-0:22
The sUAS has eyes on the rest of the section. They have relocated several hundred metres, but they are still in range of the bridge.
Update the tracker: move the ATGM box, then check.
We have the section in sight at a known location and it can still engage vehicles on the bridge. It is a threat to the crossing, so it goes straight to Target for weapon-target pairing.
Same as the engineer team at T-3:40. A threat to the bridge does not wait in Track.
-
T-0:20
The FSCC sends the fire mission to the M101 105 mm howitzer battery.
Update the tracker: move the ATGM box, then check.
The fire mission is sent, so the target is in the Engage step.
The battery is back on line. It fired at T-0:55 and needed thirty minutes to displace and re-lay.
-
T-0:15
Video clearly shows the destruction of the remaining ATGM section.
The assessment is made and the cycle is complete, so the target comes off the board. Unlike the strike at T-0:55, this one is conclusive. We watched it happen.
The commander's guidance named the ATGM section as the only thing in the enemy order of battle that can stop a vehicle on the bridge. It is gone.
-
T-0:10
Long-range ISR UAS #2 detects an ammunition supply point inside NAI 1.
According to our planning in the Decide phase, what is our decision about this target?
The ammunition supply point is a high value target. It is number 1 on the S-2's list and it holds the ammunition his mortars and his ATGM fire. It was deliberately left off the high-payoff target list.
The S-2 assessed that his fighting positions already hold three days of ammunition forward, so destroying the supply point would not stop one round inside our 48 hours. High value to the enemy is not the test. Payoff for our mission is. It stays on the high value target list and can be nominated later.
-
T-0:09
We do not have targeting guidance for this target.
What do you recommend to the commander and the FSCC? Hint: the supply point is static and would take hours to move.
Guidance from the commander: do not strike right now.
For the next nine minutes we have only one fires asset that can affect our unlocated high-payoff targets. The 105 mm battery fired at T-0:20 and needs twenty minutes to displace, so it is not ready until T=0, and the one-way attack UAS unit is still down. That leaves the 155 mm battery.
Only the long-range ISR reaches NAI 1 and NAI 3, so time it spends watching a strike on the supply point is time it is not spending looking for the enemy mortars.
We may return to the supply point later. It is not going anywhere, and we made this decision already in planning.
-
The supply point has been added to the board. Update the tracker: move the Ammo supply point box, then check.
We have recorded precisely what this target is and where it is, but we are choosing not to pursue continuous observation.
This is the same reason the ATGM section was at Fix at T-2:50. We know what it is and where it is, but nobody is watching it. There the sUAS had no battery left. Here it is our own choice.
A target does not have to be on the high-payoff target list to sit on the tracker.
-
T+0:15
Friendly forces secure the bridge.
-
T+0:20
The FSCC decides to strike the ammunition supply point. They order Long-range ISR UAS #2 to re-acquire the target.
-
T+0:30
Long-range ISR UAS #2 re-acquires the ammunition supply point. The tracker moves it to Target.
-
T+0:35
The FSCC decides to engage with the M109 155 mm battery and sends the fire mission. The tracker moves the supply point to Engage.
-
T+0:37
Before the rounds start landing on the ammunition supply point, friendly units report taking enemy mortar fire.
How do you task Long-range ISR UAS #2?
The mortars are Immediate on the HAT. An immediate target is prosecuted ahead of everything else, and certainly ahead of a target that is not on the high-payoff target list at all.
The mortars are also firing on our own soldiers now. The supply point is not going anywhere.
-
T+0:40
Long-range ISR UAS #2 locates smoke from a position just south of NAI 1. This is likely the mortar position.
Update the tracker: move the Mortars box, then check.
We know they are out there and roughly where, but we do not have them in sight and we cannot shoot smoke. That is Find.
This is the first move the mortars have made. They have been parked on the HPTL since the start, because nobody could find them.
-
T+0:43
Long-range ISR UAS #2 has eyes on a section of mortars firing.
Update the tracker: move the Mortars box, then check.
We have them in sight at a known location and they are firing on our soldiers. It goes straight to Target for weapon-target pairing, the same as the engineer team at T-3:40.
-
T+0:44
The FSCC asks which asset should shoot this mission.
What asset do we send the fire mission to?
The HAT ranks the M101 105 mm howitzer battery first against the mortars, ahead of the 155 mm and the drone.
It is also the only asset free. The 155 mm battery is still shooting the supply point mission and does not report it complete until T+0:50, and the one-way attack UAS unit has not been able to launch since T-1:04.
-
T+0:45
The fire mission has been sent to the M101 105 mm howitzer battery.
Update the tracker: move the Mortars box, then check.
The fire mission is sent, so the target is in the Engage step.
-
T+0:50
The M109 155 mm battery reports its fire mission complete and requests a battle damage assessment. At the same time, electronic signals indication picks up a large amount of traffic consistent with the enemy command radios, and places it somewhere inside NAI 3.
Where do we direct Long-range ISR UAS #2 to look?
The mortars are the Immediate target and they were firing on our soldiers a moment ago. We have to know whether that has stopped.
The command post is a high-payoff target, but it is priority 4 and its guidance is As acquired. The supply point is not on the list at all. Neither of them comes before confirming that the mortars are silent.
-
T+1:00
Rounds complete on both targets, the ammunition supply point and the mortars.
Update the tracker: move the Ammo supply point box, then check.
The mission is over, so the target moves to Assess. We owe a battle damage assessment on it, and at the moment nobody is watching it.
-
Update the tracker: move the Mortars box, then check.
The same for the mortars, and this is the one we can actually answer. At T+0:50 we sent the long-range ISR to look at them.
-
Update the tracker: move the Command post box, then check.
Electronic signals indication placed the command post somewhere inside NAI 3. That gives an area, not a point, so we know it is there but not where. That is Find.
This is the first time the command post has left the HPTL column. The whole operation has run its course and only now can we say roughly where it is.